By specs-phones | At 8:50 PM | Label :
Nokia
| 0 Comments
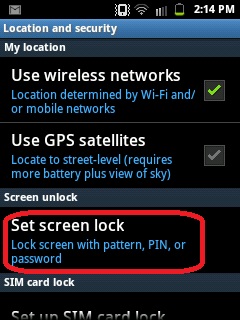
When we talk about Nokia Lumia keep in mind that there are situations where our phone can have problems and we have no choice but to Reset it. The terminals in Windows Phone, like other mobile operating systems, supports different levels of reset. Starting from a Soft Reset, with the help of implications the phone returns to the initial condition. Then we'll talk about the Hard Reset if the problem is more critical.
Windows
Phone 8 is gaining a marvelous reputation as a very stable operating
system for mobile phones. There are situation where it is still necessary to
perform a Reset of the phone. Sometimes just because the phone stop responding (usually due to some
application), or because the problem is more serious and you may have a corrupt
software on the terminal or you just want to erase every-data from the phone.
1. Soft Reset
In this case when the phone is locked and does not
respond to any action. Of course, the first thing is to make sure so just press
the power button for several seconds to see if the phone performs an
orderly shutdown. If the phone still does not respond, for phones with removable
battery , just follow these steps (which I think we all have know
already):
1. Open the terminal (removing the box as necessary)
2. Remove the battery to let the phone without power
3. Wait a few seconds for the phone fully discharged
4. Replace the battery and the corresponding case
5. Boot the phone normally

This is fine for phones with removable battery. But as
we know, Nokia is making rug phones and they also become famous thanks to
its polycarbonate body (for example, Nokia Lumia 920) and that is not
easy to remove the battery. So for these phones, how do I do?
Don't worry we have a solution for this as well.
Don't worry we have a solution for this as well.
Nokia explains that there is a way and that is to simultaneously
press the button on/off with the volume down button for about 10 seconds.
You will notice that the phone vibrates, and that's when we can release the buttons. The result is that the phone will reboot and will start as if it had been turned off. With this method, the information we have on the phone should not alerted.
You will notice that the phone vibrates, and that's when we can release the buttons. The result is that the phone will reboot and will start as if it had been turned off. With this method, the information we have on the phone should not alerted.
2.Hard Reset

With the use
of Hard Reset the phone back to its initial condition as when out of
the box and make the boot the first time. That is why it is also known as the
initial configuration reset or reset to factory settings.
During the process, reset of all data that the terminal occurs. Therefore, we can apply both when we have a problem with the phone software related suspect, or where you want to sell your phone to someone so you definitely want to erase your all data from it, Hard Reset will provide you a method to remove the information, and start settings to it's new staff from scratch.
During the process, reset of all data that the terminal occurs. Therefore, we can apply both when we have a problem with the phone software related suspect, or where you want to sell your phone to someone so you definitely want to erase your all data from it, Hard Reset will provide you a method to remove the information, and start settings to it's new staff from scratch.
The
duration of hard reset is tied to the amount of information that you
have on your phone. Therefore you've better to delete all photos, music
and videos and even installed programs yourselves to reduce the time-period for
hard reset itself.
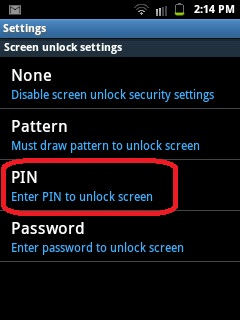
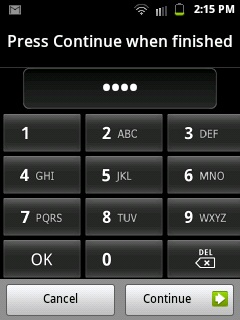
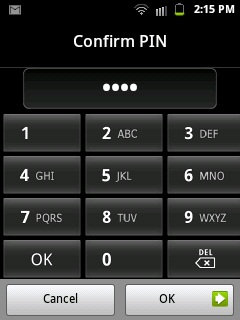
The first
method is the one that provides the Windows Phone itself As simple as going to Settings,
then move to phone information, and clicking reset your phone.
The second
method should apply to those terminals that are non-functional and
therefore not allow to reach the indicated I or menu. So, we can only
apply a method by combination of keys to try to solve the
problem.
The method is different for Windows Phone 7.x than the Windows Phone 8.
The method is different for Windows Phone 7.x than the Windows Phone 8.
Hard reset
Windows Phone 7.x:
This method
easily applies to Nokia Lumia 900, Lumia 800, Lumia 710 and Lumia 610. So, For
this type of reset we will have to take two steps. We start with
the phone off and keep pressed both buttons down volume, camera
and finally the on/off button. After a few seconds the phone will vibrate.
At that
moment the phone to vibrate, You've to keep pressing the buttons
on/off and down the other two (volume down and camera) aboutfive seconds. The
phone should boot back to the factory settings.