Showing posts with label Nokia. Show all posts

Thursday, February 26, 2015

How to Perform a Soft Reset or Hard Reset Nokia Lumia in Any Terminal

By specs-phones | At 8:50 PM | Label : | 0 Comments
When we talk about Nokia Lumia keep in mind that there are situations where our phone can have problems and we have no choice but to Reset it. The terminals in Windows Phone, like other mobile operating systems, supports different levels of reset. Starting from a Soft Reset, with the help of implications the phone returns to the initial condition. Then we'll talk about the Hard Reset if the problem is more critical.

Windows Phone 8 is gaining a marvelous reputation as a very stable operating system for mobile phones. There are situation where it is still necessary to perform a Reset of the phone. Sometimes just because the phone stop responding (usually due to some application), or because the problem is more serious and you may have a corrupt software on the terminal or you just want to erase every-data from the phone.

1. Soft Reset
In this case when the phone is locked and does not respond to any action. Of course, the first thing is to make sure so just press the power button for several seconds to see if the phone performs an orderly shutdown. If the phone still does not respond, for phones with removable battery , just follow these steps (which I think we all have know already):

1. Open the terminal (removing the box as necessary)
2. Remove the battery to let the phone without power
3. Wait a few seconds for the phone fully discharged
4. Replace the battery and the corresponding case
5. Boot the phone normally


This is fine for phones with removable battery. But as we know, Nokia is making rug phones and they also become famous thanks to its polycarbonate body (for example, Nokia Lumia 920) and that is not easy to remove the battery. So for these phones, how do I do?
Don't worry we have a solution for this as well.

Nokia explains that there is a way and that is to simultaneously press the button on/off with the volume down button for about 10 seconds.

You will notice that the phone vibrates, and that's when we can release the buttons. The result is that the phone will reboot and will start as if it had been turned off. With this method, the information we have on the phone should not alerted.


2.Hard Reset


With the use of Hard Reset the phone back to its initial condition as when out of the box and make the boot the first time. That is why it is also known as the initial configuration reset or reset to factory settings.


During the process, reset of all data that the terminal occurs. Therefore, we can apply both when we have a problem with the phone software related suspect, or where you want to sell your phone to someone so you definitely want to erase your all data from it, Hard Reset will provide you a method to remove the information, and start settings to it's new staff from scratch.

The duration of hard reset is tied to the amount of information that you have on your phone. Therefore you've better to delete all photos, music and videos and even installed programs yourselves to reduce the time-period for hard reset itself.
The first method is the one that provides the Windows Phone itself As simple as going to Settings, then move to phone information, and clicking reset your phone.
The second method should apply to those terminals that are non-functional and therefore not allow to reach the indicated I or menu. So, we can only apply a method by combination of keys to try to solve the problem.

The method is different for Windows Phone 7.x than the Windows Phone 8.
Hard reset Windows Phone 7.x:
This method easily applies to Nokia Lumia 900, Lumia 800, Lumia 710 and Lumia 610. So, For this type of reset we will have to take two steps. We start with the phone off and keep pressed both buttons down volume, camera and finally the on/off button. After a few seconds the phone will vibrate.

At that moment the phone to vibrate, You've to keep pressing the buttons on/off and down the other two (volume down and camera) aboutfive seconds. The phone should boot back to the factory settings.


Friday, January 11, 2013

Huawei Ascend D Quad and D Quad XL Wi-Fi Hotspot Setting: Step by Step Tutorial.

By specs-phones | At 12:15 AM | Label : , , , , , , , , , , | 0 Comments
Huawei Ascend D quad XL support 2G Network GSM 850 / 900 / 1800 / 1900 and 3G Network HSDPA 850 / 900 / 1700 / 1900 / 2100 network. It has Android OS, v4.0 (Ice Cream Sandwich). It has WLAN Wi-Fi 802.11 b/g/n, Wi-Fi hotspot, DLNA. Now I will show you that how can you connect your Huawei Ascend D Quad and D Quad XL withWi-Fi network using WiFiFinder Application. Now see my step by step tutorial.

Wi-Fi Finder requires phone call permission on the phone version as an easy way to call the public Wi-Fi location when viewing the detail view of a Wi-Fi hotspot. The app will NEVER make calls unless you explicitly click on the phone icon and confirm that you would like to call the Wi-Fi location.


Never worry again about not finding a Wi-Fi internet connection. Wi-Fi Finder is simply the best app for finding free or paid public Wi-Fi hotspots online or offline—perfect for Skype users on the go!

Step 1: Scan Wi-Fi hotspots
Scan for Wi-Fi hotspots around you for connect your Huawei Ascend D Quad and D Quad XL with Wi-Fi Hotspot.

Step 2: Search Public Wi-Fi

You can search for public Wi-Fi anywhere in the world for this version of the Huaweimobile phone.


Step 3: Wi-Fi Hotspot Detail 
You can see Wi-Fi hotspot detail, call location of the user directions and you can also share the share the hotspot


Step 4: Filter Wi-Fi Hotspot Locations
You can filter your Wi-Fi Hotspot searching results by location such as café or hotel etc or provider type. You can filter the locations.


Step 5: Wi-Fi Works both Online and Offline
You can set your Huawei Ascend D Quad and D Quad XL working mode. It can work both online and offline mode.


In this way you can connect your Huawei Ascend D Quad and D Quad XL with Wi-Fi network using WiFi Finder Application.

How to Change Symbian S60V3 Default Menu Indicators Style: Read My Step By Step Tutorial.

By specs-phones | At 12:11 AM | Label : , , , , , , , , , , | 2 Comments
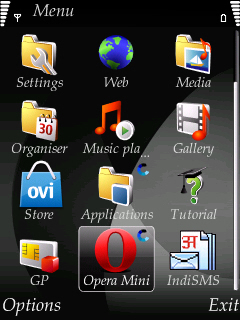
How are you? Today I will show you how to change the default menu of indicators ofSymbian S60V3. When you run an application in Symbian mobile and minimize the application during running process then which icon or sign of the application you see is called the menu indicator? For example in the application folder of my mobile I open one application and opera mini this two application. 


See the Application and the opera mini symbol is same. This is menu indicator. Now see when I change this indicator of my Symbian S60V3 Default Menu then how it looks like. For better understanding I provide the image below: Symbian S60V3 Default Menu Indicators Style 1.


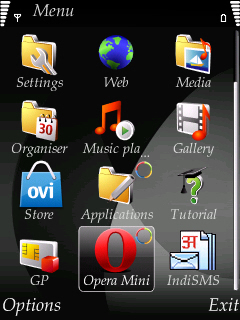
Symbian S60V3 Default Menu Indicators Style 2:


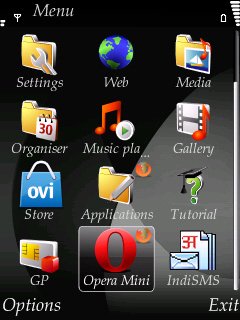
Symbian S60V3 Default Menu Indicators Style 3:


When you change the menu indication then the icon of some application and folder also is changed. If you want to change the indicator of your Symbian S60V3 default menu then follow my steps.


Step 1: Create a folder named Patches in the memory card of the mobile. Open C drive with Xplore. Now copy Open4All RP+ from Patches folder and paste it in the Patches folder in the memory card.


Step 2: Now copy c2z Patch and paste it in the Patches folder of the memory card.


Step 3: Now open Rom Patcher and add the two patches just click Add to auto and then click apply.


Step 4: Now download the menu indication zip file from HERE and unzip it. You can see 26 zip files here. Now which menu indicators you like unzip it.


Step 5: After unzip we see a file named menu.mif. Now copy menu.mif with Xplore and paste it in C: -> resource -> apps.


Step 6: Now close Xplore and restart your mobile then you can see you’re default menu indicator will change.


Thanks for reading my blog. If you have any query please post your comment and share your experiences with us.

Monday, January 7, 2013

Tips For Protect Your Google Alert,Facebook, Twitter, Gmail and Pay in Cash Privacy.

By specs-phones | At 8:40 PM | Label : , , , , , , , , , , | 0 Comments
Over the weekend, I wound up at Washington, D.C.’s Trapeze School with a group of friends. Before one of them headed up a ladder to attempt a somersault landing from the trapeze bar, she handed me her phone and asked me to take photos. “What’s the password?” I asked. “I don’t use one,” she replied. My jaw dropped as it often does when someone I know tells me they’re choosing not to take one of the very simplest steps for privacy protection, allowing anyone to snoop through their phone with the greatest of ease, to see whichever messages, photos, and sensitive apps they please.

So this post is for you, guy with no iPad password, and for you, girl who stays signed into Gmail on her boyfriend’s computer, and for you, person walking down the street having a loud conversation on your mobile phone about your recent doctor’s diagnosis of that rash thing you have. These are the really, really simple things you should be doing to keep casual intruders from invading your privacy.

1. Password protect your devices: your smartphone, your iPad, your computer, your tablet, etc. Some open bookers tell me it’s “annoying” to take two seconds to type in a password before they can use their phone. C’mon, folks. Choosing not to password protect these devices is the digital equivalent of leaving your home or car unlocked. If you’re lucky, no one will take advantage of the access. Or maybe the contents will be ravaged and your favorite speakers and/or secrets stolen. If you’re not paranoid enough, spend some time reading entries in Reddit Relationships, where many an Internet user goes to discuss issues of the heart. A good percentage of the entries start, “I know I shouldn’t have, but I peeked at my gf’s phone and read her text messages, and…”

2. Put a Google Alert on your name. This is an incredibly easy way to stay on top of what’s being said about you online. It takes less than a minute to do. Go here. Enter your name, and variations of your name, with quotation marks around it. Boom. You’re done.

3. Sign out of Facebook, Twitter, Gmail, etc. when you’re done with your emailing, social networking, tweeting, and other forms of time-wasting. Not only will this slightly reduce the amount of tracking of you as you surf the Web, this prevents someone who later sits down at your computer from loading one of these up and getting snoopy. If you’re using someone else’s or a public computer, this is especially important. Yes, people actually forget to do this, with terrible outcomes.

4. Don’t give out your email address, phone number, or zip code when asked.Obviously, if a sketchy dude in a bar asks for your phone number, you say no. But when the asker is a uniform-wearing employee at Best Buy, many a consumer hands over their digits when asked. Stores often use this info to help profile you and your purchase. You can say no. If you feel badly about it, just pretend the employee is the sketchy dude in the bar.

5. Encrypt your computer. The word “encrypt” may sound like a betrayal of the simplicity I promised in the headline, but this is actually quite easy to do, especially if you’re a MacHead. Encrypting your computer means that someone has to have your password (or encryption key) in order to peek at its contents should they get access to your hard drive. On a Mac, you just go to your settings, choose “Security and Privacy,” go to “FileVault,” choose the “Turn on FileVault” option. Boom goes the encryption dynamite. PC folk need to use Bitlocker.

6. Gmailers, turn on 2-step authentication in Gmail. The biggest takeaway from the epic hack of Wired’s Mat Honan was that it probably wouldn’t have happened if he’d turned on “2-step verification” in Gmail. This simple little step turns your phone into a security fob — in order for your Gmail account to be accessed from a new device, a person (hopefully you) needs a code that’s sent to your phone. This means that even if someone gets your password somehow, they won’t be able to use it to sign into your account from a strange computer. Google says that millions of people use this tool, and that “thousands more enroll each day.” Be one of those people. The downside: It’s annoying if your phone battery dies or if you’re traveling abroad. The upside: you can print a piece of paper to take with you, says James Fallows at the Atlantic. Alternately, you can turn it off when you’re going to be abroad or phone-less. Or you can leave it permanently turned off, and increase your risk of getting epically hacked. Decision’s yours.

7. Pay in cash for embarrassing items. Don’t want a purchase to be easily tracked back to you? You’ve seen the movies! Use cash. One data mining CEO says this is how he pays for hamburgers and junk food these days.

8. Change Your Facebook settings to “Friends Only.” You’d think with the many Facebook privacy stories over the years that everyone would have their accounts locked down and boarded up like Florida houses before a hurricane. Not so. There are still plenty of Facebookers that are as exposed on the platform as Katy Perry at a water park. Visit your Facebook privacy settings. Make sure this “default privacy” setting isn’t set to public, and if it’s set to “Custom,” make sure you know and are comfortable with any “Networks” you’re sharing with.

9. Clear your browser history and cookies on a regular basis. When’s the last time you did that? If you just shrugged, consider changing your browser settings so that this is automatically cleared every session. Go to the “privacy” setting in your Browser’s “Options.” Tell it to “never remember your history.” This will reduce the amount you’re tracked online. Consider a browser add-on like TACO to further reduce tracking of your online behavior.

10. Use an IP masker. When you visit a website, you leave a footprint behind in the form of IP information. If you want to visit someone’s blog without their necessarily knowing it’s you — say if you’re checking out a biz competitor, a love interest, or an ex — you should consider masking your computer’s fingerprint, which at the very least gives away your approximate location and service provider. A person looking at their analytics would notice me as a regular visitor from Washington, D.C. for example, and would probably even be able to tell that I was visiting from a Forbes network address. To hide this, you can download Tor or use an easy browser-based option.

These are some of the easiest things you can do to protect your privacy. Ignoring these is like sending your personal information out onto the trapeze without a safety net. It might do fine… or it could get ugly. These are simple tips for basic privacy; if you’re in a high-risk situation where you require privacy from malicious actors, check out EFF’s surveillance self-defense tips.

Sumber : http://tipsabc24.blogspot.com

Saturday, December 22, 2012

Nokia and Microsoft Windows 8 Phone Features

By specs-phones | At 9:21 PM | Label : | 0 Comments

Microsoft and Nokia are holding a press conference on Sept. 5 in New York to discuss Nokia’s Lumia brand of Windows phones. While Verizon isn’t expected to be part of that event, the carrier intends to roll out a Nokia phone later, said the person, who asked not to be named because the plans are private. 

That would give Nokia a new beachhead at the top U.S. carrier, building on its longstanding relationship with No. 2 AT&T (T) Inc.

Features
Nokia Windows 8 Phone
Network
WiFi, GPS and 3G capability
Support By
Unity Technologies
Released By
Nokia (NOK) and Microsoft’s (MSFT)
Design
Unibody polycarbonate design
Content
Wildly creative and intelligently interactive 3D and 2D content
Voice Calls
Yes
Size
4.3-inch with curved edges
VoIP Service
Yes
Wireless Call
Yes
Games
Strong gaming ecosystem-PC, Xbox, and Mobile Devices
Modem
A voice-capable 3G modem
Radio supports
Quad-band 2G and peta-band 3G.
Skype
Yes
Released Date
November 2012.
Primary
Front-facing camera
Software
Able to run on devices with speedier, dual-core chips and high-definition screens
OS
Windows Phone 8 and Windows 8 Both
Graphics
high-caliber Unity3D graphics engine
GPS
Yes- telephonic voice capability

Windows 8 could support voice calls, it’s been suggested, after a Metro UI tile for phone functionality was spotted during a BUILD 2011 session last week. The slide, istartedsomething caught, has a Windows Phone 7 style “Missed Calls” dialog complete with times and dates of recent incoming voice calls. However, it’s also possible that this could be a VoIP service, or indeed some form of wireless call management when pairing a Windows 8 tablet or phone with a Windows Phone 7 handset. 


The next generation of Windows Phone devices will reportedly support the high-caliber Unity3D graphics engine. WMPoweruser notes that Unity3D developer Unite Technologies has announced it will support both Windows Phone 8 and Windows 8 when the two operating systems are released later this year. As the site writes, this is very significant because “developers will have a very easy time porting high quality, graphics-intensive games to Windows Phone 8 from the iPhone,” meaning that Windows Phone 8 will already have a strong gaming ecosystem ready to go when it finally launches.

Sony Xperia J ST26i Phone Specification and User Review.

By specs-phones | At 9:16 PM | Label : | 0 Comments

Sony Xperia J ST26i official image leaks


Sony seems to be on a mission to flood the market with as many smartphones as possible. The latest member of this crusade is the Xperia J ST26i, which was spotted by ePrice.

The Xperia J will be a mid-range budget smartphone that comes with a 4-inch, 854 x 480 resolution display, 1GHz Qualcomm Snapdragon S1 MSM7227A processor, 5 megapixel rear camera, VGA front camera and a 1,700mAh battery. The phone is likely to be running on Android 4.0, Ice Cream Sandwich.

The Xperia J looks a lot like the older Xperia arc, with the same curved backside designed to aid grip. From the front, however, it bears more resemblance to some of Sony's recent models. The bottom of the phone is said to have multi-colored LEDs such as the ones on the Xperia U.There is no information available regarding the pricing or the launch date of this handset.


Sony Xperia J ST26i official image leaks - reader comments
i say no to this phone. Most likely its gonna be the same price of the arc s....and the arc s has a 1.4ghz, 8mp and a 205.


i really can not understand why everyone keeps using snapdragons s1 and not s2. less powerful, adreno 200 is nothing compared to 205 and less energy eficient.


This indeed would be great, many want a physical keyboard on a small phone, not everyone wants a giant screen raping his pocket. By the way... Where are Sony's QWERTY phones??? last two were the Pro and Mini Pro...

How to Set Nokia 808 PureView White Balance in the Nokia 808 PureView Camera?

By specs-phones | At 9:07 PM | Label : | 0 Comments

White balance (WB) is a global adjustment of the intensity of the colors. The aim is to render the colors, particularly the neutral colors (such as gray and white), correctly.

Auto White balance Setting: Nokia 808 PureView
The auto White balance gives you excellent results in most situations. The Automatic shooting mode and most of the Scenes shooting modes use the auto White balance setting.

Creative Shooting White balance Setting: Nokia 808 PureView
The Creative shooting mode of Nokia 808 PureView offers some different White balancepresets. With those presets you can get very consistent results in certain lighting conditions. White balance presets offer you the possibility to get some special color effects, for example, either a yellowish or bluish tone, into the photos depending on the setting and lighting conditions. 


You can get a heavy boost on the blue tones by using the incandescent White balancesetting on early morning landscape photos just when the sun is about to rise. Or, you can get a nice boost on the yellow, orange, and red tones by using the sunny White balance setting on the sunset photos. 

In the sunset case, auto White balance might wash out the colors too much, as it targets to find the white point in the photo. To change the white balance setting, make sure you are in the Creative shooting mode, and then select the White balance icon on the left and a setting.


Most of us do not know that what the White balance in the phone camera is. In my post I want to post about the type of White balance in the Nokia 808 PureView phone camera. If you want to share your views with us please put your comment in the comment box below.
Posting Lama ►
 

Visitor

Copyright © 2012. specs phones - All Rights Reserved B-Seo Versi 5 by Bamz my free template